| See Also |
 How I Built My Greenhouses
This page is about how I built my greenhouses, and how they work.
While it is certainly possible to buy a hobby greenhouse from any number of vendors ( and I have a page detailing the different types ), the typical hobby greenhouse is not well equipped to provide for all the needs of the plants within. And it's expensive. I've built both of my greenhouses as wood frame buildings - they're strong, and they don't rot if they're built correctly.
A wood frame greenhouse is easy to adapt and modify. It uses inexpensive, readily available standard materials. Instead of going to some hoity-toity greenhouse store, you can go to Home Depot.
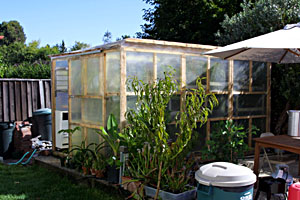
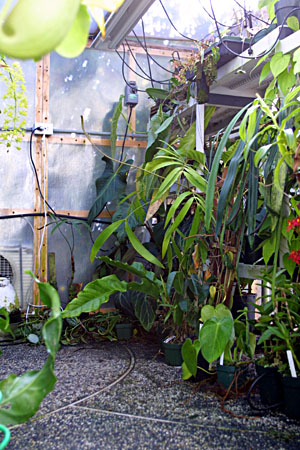
My larger, older greenhouse was made using 4"x4" posts on 4 foot centers in a post and beam configuration - this allowed for strength, and it allowed for large, unobstructed window panes. The smaller greenhouse I made from 4'x6' wood frame panels, which I prefabricated from 2"x2" douglas fir in my garage. These panels were easy to work with, very stiff ( they were assembled with glue and nails ), and again had little wood obstructing the window panes. Each panel was made from 2 2x4's - at a cost of about $5 per panel. I attached one layer of sheet fiberglass to each panel before assembling the structure.
Some successful greenhouses, especially hoop houses, have been constructed using PVC pipe as a framing material. I will just say that PVC pipe is fairly cheap, but the fittings are not. The structures I have made with PVC have tended to sag. Maybe I'm just in need of some instruction, and the temptation to try just one more time is always there. PVC pipe is an attractive building material because it's so light, rot resistant and easy to work with.
Some people use 6 mil plastic sheeting for temporary greenhouses. This material tends to die after about one season, though it is perhaps the easiest to work with. It is possible to get special UV resistant plastic sheeting, and double layers of plastic sheeting, held apart by a blower.
Double wall and triple wall polycarbonate panels are available from various greenhouse supply sources. The major problem with these is cost - a single 4x12 panel could easily cost $100, and once you add in the costs for a capping and mounting system, you are well over that mark.
Probably the best suited material for a do-it-yourself greenhouse is flat sheet fiberglass. It's relatively easy to work with, and available in rolls, which makes shipping much more reasonable. Costwise, it runs about half that of double wall polycarbonate. For extra insulation, you can use a double layer - one on each side of the framing, though that brings you back into the range of the double wall material.
In the end, it may be a toss-up between double wall materials and sheet fiberglass, depending on your sources. The cheapest is still corrugated fiberglass sold as a roofing material, even with its sealing problems.
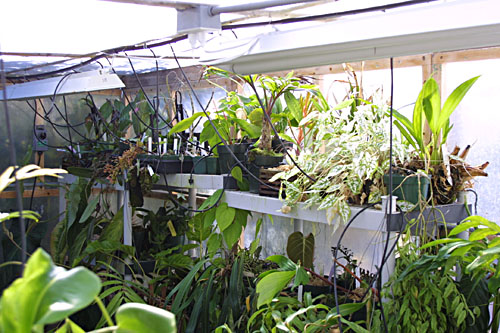
In my latest greenhouse, I used the modular plastic shelving sold at home depot ( 3' x 18" size ). It's very light and strong, reasonably cheap, rot resistant, and extrememly easy to re-configure. The only beef I have with it is that it's not available in more sizes. Unless your greenhouse is designed to accommodate bench in 3 foot sections, there will always be areas where things don't quite fit.
Since so many tropical plants are epiphytic, some hanging basket area is a good idea. I've found that a length of 1/2" galvanized steel pipe hung from the ceiling over the benches makes an excellent and flexible hanger. I've also used wire shelving mounted near the ceiling for an even more flexible hanging grid. The only problem I've had with the shelving is that even the epoxy coated stuff eventually rusts.
I've always wanted to install a wet wall in my greenhouse, and maybe I will get around to it someday. The concept, if you have not considered it, is to make a wet, wall like structure for plants to climb. This is usually done using wire mesh and sphagnum moss, with some re-bar to give it structure. I am considering how I can accomplish this using plastic components to avoid leaching rust and metals into the water supply.
First of all, in an emergency, portable electrical heaters might just keep your plants alive. In a greenhouse of any size, and a climate that ever gets below freezing, they won't be enough to keep the more sensitive tropical species which die when it hits 60F. Electricity is also just about the least efficient and most expensive method of heating a greenhouse.
I've had natural gas heat in my previouse greenhouses, and I'm hoping to install it in my current greenhouse before this winter. It's much cheaper than electric, reasonably reliable, and much easier to make more powerful. What I've used, and what you most likely want, is a 30k BTU to 60k BTU wall furnace. They make short console models, which are sold at Home Depot in my area, which are just the right thing. The taller gravity fed gas furnace models are a little more difficult to mount.
Another type of gas heater you might want to consider is a heater designed for a camper/trailer. These run about $400-$500 and often use a 12 volt power supply to blow air across themselves.
You definitely want to use a furnace that vents outdoors, rather than releasing the combustion byproducts indoors. Some of these exhaust fumes can be damaging to some of your plants, and I am sure you don't want to be the one doing research as to which plants that might be.
A kerosene or propane heater for emergencies might also be a good investment, though I will tell you that I've had a backup kerosene heater for several years now, and it has not found good use yet. I even survived a couple of winters ( and an extra several hundred dollars on the electric bill ) with electric heat, and let me tell you - My plants and I are much happier with gas heat.
Alright, so you've got your gas heater installed, and your plants are all toasty warm during the night. But in the daytime, and in the summer, you're going to have the opposite problem. Your plants are going to get too hot. What to do?
You might think you need a fan. Or an air conditioner.
What you need is some form of evaporative cooling - a "swamp cooler".
An air conditioner will reduce the humidity, and uses a lot of electricity. Fans by themselves cannot make the greenhouse cooler than the outside air, and they also may decrease the humidity below acceptable levels.
An evaporative cooler works by using dry outside air to evaporate water, thus becoming cooler and more humid - perfect for cooling a greenhouse. In many parts of the country, these units are used instead of air conditioning on homes and even businesses. Because they just use a fan and a small water pump, the energy cost of running one of these is much less than that of an air conditioner.
In some subtropical regions, the humidity can be too high for evaporative coolers to be effective. There, shade cloth and lots of air circulation is about all that's possible short of installing an air conditioner. However, even in hot damp places like Miami, evaporative coolers can be sufficient.
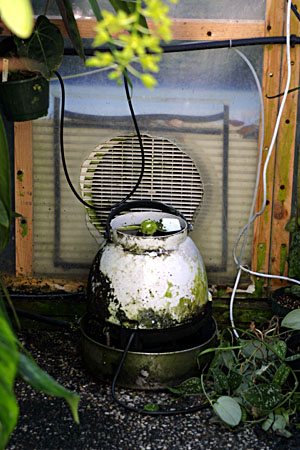
Most of the evaporative coolers available commercially use a filter pad of some sort, over which water is pumped. Air is blow from the outside, through the damp filter pad, and into the greenhouse. These types of cooler are great for greenhouse use, mounted on the outside of the main building. For additional and more effective cooling, and evaporative cooler can be paired with a misting system. By generating mist in the air stream of an evaporative cooler, or even just a ventilation fan, additional water is evaporated into the air, cooling it further and increasing the humidity even more.
There are three types of misting systems: ultrasonic foggers, centrifugal foggers, and nozzle based misters. The ultrasonic fogger is expensive for the amount of fog created, and uses a lot of electricity.
The centrifugal fogger generates a mist by flinging water rapidly against a screen. Centrifugal foggers are expensive, running in the hundreds of dollars, but they are very effective, and generally not effected by water with a high mineral content. Centrifugal foggers are very reliable, working reasonably well even when dirty. I use a centrifugal fogger hooked up to a humidistat in front of my evaporative cooler, and it keeps my greenhouse cool and moist year round.
The nozzle based mister generates a mist by forcing water throught a very small opening. Some of these use auxilary pumps to create a very fine mist with extremely high pressure. Others, sold in hardware stores and home depot as cooling devices, simply work off of home water pressure. Because of the very small nozzle involved, nozzle based misters are prone to clogging. They are also more sensitive to mineral laden water. They can be very inexpensive, especially when bought on clearance at the end of the summer season.
A word here about mineral content in the water - if your water comes from a well, or the city water comes from a well, your water supply may have a high mineral content. Any fogger will leave white powdery residue from the evaporated water, and many types of fogger will be prone to clogging and encrustation. The best solution is a complicated one involving reverse osmosis treatment ( see the section on water below ). Otherwise, I would highly recommend trying out a centrifugal fogger and hosing things down by hand when they become too powdery.
Cheap shadecloth is usually available at your local garden center, hardware store, or Home Depot. It's normally green or black, and sold as a covering for patios and the like. It works, though it doesn't last forever. Usually, shade cloth is applied on the outside of the greenhouse structure, suspended on wires or other supports just about the roof. The reason for this is to provide air circulation between the shade cloth ( which gets hot, absorbing the suns rays ), and the greenhouse itself.
You may not need shadecloth on your greenhouse, especially if you use a double layer of fiberglass. Many glazing materials absorb and diffuse sunlight just fine on their own. I don't use shadecloth in my greenhouse, though I do put a patio umbrella to the south side of the greenhouse in the summer.
There are more permanent methods of shading, such as shade paint available through your greenhouse supplier. You can also use redwood or plastic lattice material to shade the greenhouse. You can situate your greenhouse next to deciduous trees, which will provide some shade in the summer. You will generally want to remove the shading material in the winter when the sun is weaker.
Shade loving tropical plants, of which there are many, grow well in the lower shelves and under the benches, getting their shade from the many plants growing above.
If there were one thing I could tell you that would cut down plant disease in your greenhouse and cause your plants to thrive, it would be to make plans for adequate ventilation.
Plants need air circulation. It helps them with gas exchange, and it helps to discourage mold. It also seems to help reduce insect populations, perhaps because healthier plants fight off disease much better. You need to prevent any areas in your greenhouse that have still air, any time of the day.
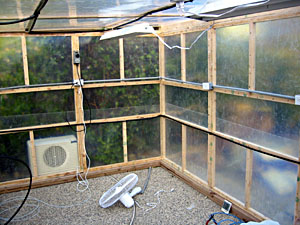
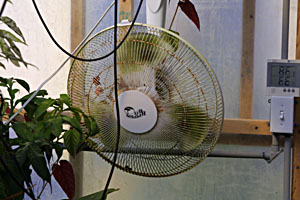
The best way to provide air circulation is with fans. The cheapo Walmart ( or Home Depot ) box fans do a fine job, and they last a surprisingly long time, even in a humid greenhouse running 24 hours a day. I pulled working fans that had been running in my old greenhouse for over 5 years, nonstop. My ruls of thumb for the greenhouse is that you should be able to sense air movement anywhere in the greenhouse you try - there should be no pockets of stagnant still air. In my current 96sqft greenhouse, that means at least two fans in the corners, running continuously.
I do not use the oscillating fans, because I have found them to be less reliable. Or to put it more accurately, the fans I use do not oscillate, though some of them did, for a few months, before they stopped. The cheaper box fans seem the most efficient and most reliable.
I cannot emphasize enough how air movement will help your plants to be all that they can be.
If your water is relatively low in minerals where you live ( ask your local water department, or get a water hardness test from the aquarium store ), you can probably use it unfiltered in your greenhouse. You may want to try to warm it a little bit before watering, using a length of hose coiled in the greenhouse, or an inline water heater, to avoid shocking your plants.
If your water has mineral impurities, you will need to filter it in order to grow the healthiest plants. This is not to say that you cannot have a thriving collection without filtered water, but it will make a difference. The only type of filter that really works is a reverse osmosis filter system, ( though de-ionization filters work very will in commercial applications, without someway to recharge the filters, they are less appropriate for the home user ). Reverse osmosis systems work by forcing water under pressure through a filter memberane which will pass water molecules, but not other larger molecules. The filter generates a stream of less pure waste water as well as a stream of extremely pure filtered water. The waste water can go to water the lawn, or other less sensitive plants.
They make and sell a home reverse osmosis filter, with a tank and a little spigot, which you can buy at Costco on occasion for about $180. It works, but the output pressure isn't too great, and the capacity is low. The best solution, and one I have had some experience with, is to use a 50 gallon/day filter unit from the aquarium supply store, feed the output into a trash can, and feed that into a small pressure tank with a 120V demand pump ( shurflo ) from the RV supply place. A solenoid valve on the input to the resverse osmosis filter attached to a float switch ( check out the pneumatic ones from the aquarium supply place ) will automate the filling process. That gives you about 50 gallons of high pressure reverse osmosis water per day, enough for a reasonably sized greenhouse.
Your plants need to be watered every day.
Most tropical plants do best in a light, airy, well drained potting mix. This mix can dry out fast, and for best plant growth, water needs to be always available. Probably the least wasteful and most controllable way to accomplish this is to use a drip watering system, pieced together from the Home Depot or hardware store of your choice. I use sprinkler valves and a sprinkler timer to automate my watering, and I have several different water circuits in the greenhouse to give me a choice of watering duration for the different plants.
I mostly use individual drippers brought out to each pot, but for small pots and tillandsias, I will use misters or sprinkler attachments. Note that the larger commercial drippers available from farm supply places online are much less clog-prone than the ones you can get at Home Depot. Also note that there are two types of supply tubing available - vinyl and poly. The vinyl tubing is a lot easier to work with, being much more flexible and able to route around pots and the like. I have noticed that the vinyl tubing is sadly becoming less common.
Watering once per day in the morning is probably best. This allows plants to be relatively dry by nightfall, and less prone to rot and mildew that can form overnight. It also gives them the most water during the daytime when the temperatures are higher and transpiration is greatest.
I have never worried too much about getting water on the leaves of plants. Rainforest plants in particular get water on their leaves year round every year - whole colonies of plants can spring up on the leaves of other plants, and most rainforest plants have developed leaves which shed water easily. I do worry about non-aquatic plants sitting in water for any length of time, however. Most epiphyte roots are built to have pretty direct air exchange, and it's easy for the roots to drown and rot given too much water.
The difference between a yellowing, sickly plant collection, and a deep green thriving one could well be fertilization. Champion sized plants don't grow without a little help. Overfertilization can hurt your plants as much as underfertilization. Don't fertilize carnivorous plants, for instance, unless you really know what you're doing.
I use a time release fertilizer when I repot plants that live in soil. Osmocote is available in large bags at Home Depot for less than you'd think, and it lasts around six months. Every couple of weeks, I supplement this with an application of miracle grow from a watering can. You can also dump miracle grow into your water supply, especially if you use the reverse osmosis system described above. Fertilizing at most every two weeks or so seems to be adequate.
I would caution you that liquid fish fertilizer is nice, but smelly. Very smelly. Granular fertilizers tend not to get applied evenly, and tend to burn as well. As for specialized orchid fertilizers, you can use it if you can afford it, but I doubt very much you'll see much difference between that and the cheaper Miracle Grow kind.
There is an evil smelling product called "Superthrive!". You can get it at your local garden center, and the package is unmistakable, festooned with all manner of Exciting! Advertising!. They even sell it in 55 gallon drums, if you want. I used it for a while. I had great plants. I ran out and didn't buy more. I still have great plants. You can try some out and draw your own conclusions. It does smell evil, though.
More recently, I've taken to spraying plants with diluted dish soap, keeping the air circulation up, picking off individual offenders, and quarantining new plants. I have lost several plants to insect damage, but for the most part, my collection is remarkably healthy despite the lack of chemicals. My conclusion is that if your plants are healthy, they will resist insect damage on their own. You can use chemicals, which may kill the insects, or may kill the plants. The solution is never as simple as spraying, sitting back and relaxing, that's for sure.
The point is that your greenhouse can help you control pests. Filtering the air coming in, making sure you have adequate conditions for the plants, providing good air circulation, good temperature control and an appropriate amount of light; these will all contribute to helping control pests and disease.
Whatever method I end up using for pest control, I still do occasionally get the urge to go in there and nuke them all.
You should ask yourself that question from time to time. The reliance on automation could leave you out of luck and out of a lot of expensive cooked plants in the event of a mid-day power outage. We always think that it won't happen to us, but it did happen to me last year, just after I moved my plants into the new greenhouse. It wasn't a city wide power outage, but a GFI breaker blew one morning ( water got into a heater control ), and I did not find out about it until I came back to a crispy green house that evening. Luckly, most of my collection recovered, but just one day without ventilation managed to set back a lot of plants, and even kill a few.
Simple systems to do things like open vents and doors in the even of a power outage, to release misting or irrigation water, or to activate a generator or other power supply to keep the ventilation fans running are something to think long and hard about. We all think it won't happen to us until it actually does.